Includes affiliate links that help offset our expenses at no cost to you.
Expedition Bikepacking is a pretty interesting pursuit. While many touring trips are done on the road, some are remote and more difficult. Somewhere between hiking and overlanding (by vehicle), bikepacking offers many benefits to the adventurer. You can get to those places on the ever narrowing trails where you can’t take a vehicle. And. . . you can do it much faster than hiking. The ultimate capacity of a bike with trailer means you can include rock climbing gear or resupply a small camp with new provisions or gear.
But, packing a bike is a new endeavor for many adventurers. Most can pack their vehicles and there is no shortage of advice on the internet about packing for a hike. Bikepacking has many considerations. Getting a start on expedition biking requires the adventurer to “think differently” about packing. Here, we will explore some options for getting started in bikepacking. We will cover the “on the cheap” system and the “I have a reasonable budget to spend” version.

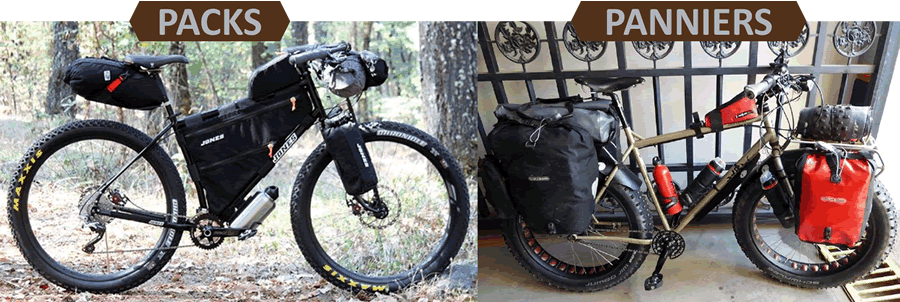
Let’s start with some basic concepts about expedition biking. There are really two types of expedition biking – bike-“packing” and bike-“touring”. Both have lots of overlap, where they are different is their travel style. Commonly, touring involves heavily loaded bikes, which normally keeps them on roads and main routes. Bikepacking is more about exploration. Whether it be wilderness ATV trails, off-pavement roads, backcountry pathss, or singletrack.
The biggest difference is how the bags and packs are set up. Traditional touring typically uses racks and panniers; on bikes designed for that purpose. Bikepacking is simple. Most bikes can serve as a bikepacking bike as long as it’s intended for you terrain you will encounter. Any frame style will do from full-suspension, cycle-cross, to hardtail, fat bikes, rigid frame. Because bikepacking is normally lighter, standard wheelsets will work as well as most gear ranges. Some bikes are covered in eyelets for mounting all sorts of handy attachments and others are ‘clean’ and straps/clamps hold gear on.
The number one consideration for attaching something to a bike for travel is security. Not security against clever bears but security against vibration. Nothing will be more frustrating than your load shifting or falling off and you not having a very good way of fixing the problem far from home. Gear can be attached in any way you like as long as it’s nice and secure even when subjected to the amazing vibration that a harsh trail can dole out.
The downside to bikepacking should be obvious – less room for gear and it takes some careful consideration to pack soft bags as opposed to panniers. Initially, you will have to overcomplicate things and be a little fussy about your choices of gear and bag.
A minimal rig, however, can be a terrific way to explore. When you have to halt your overlanding rig when the trail narrows (with 8 miles to go to the cliff), you can load up the bike and ride there 3-4 times faster with a bike.
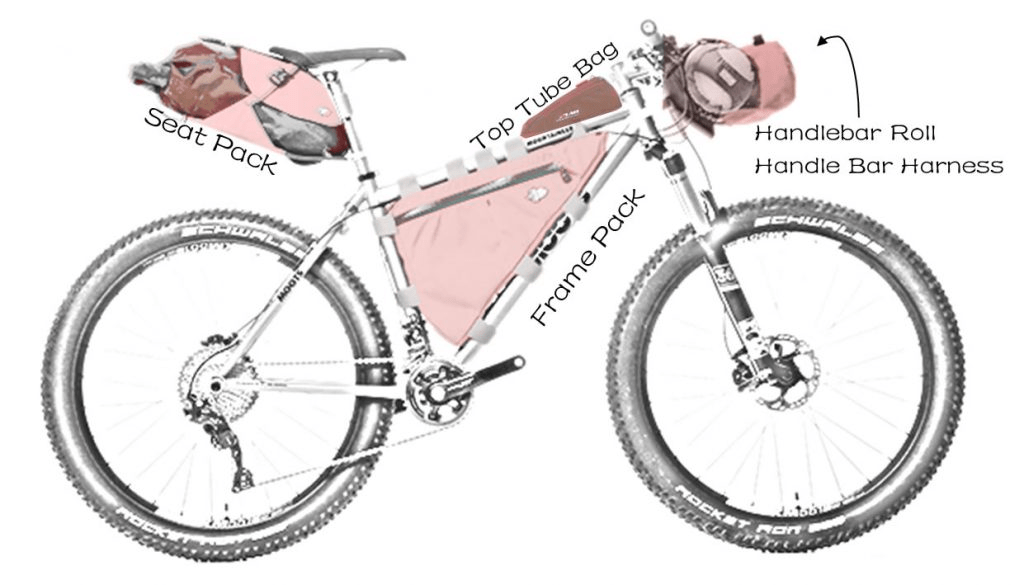
To get a good understanding of what a bikepacking kit usually has a few things in common. There are 4 main concepts – a framepack, a handlebar bag (harness), a seatpack and peripheral bags & accessories (placed on the handlebars, forks or frames). The key to getting the concepts to work as a bikepacking rig, is to spread the weight across the bike as low and centered as possible.
We will endeavor to investigate the basics here:
FRAME PACKS
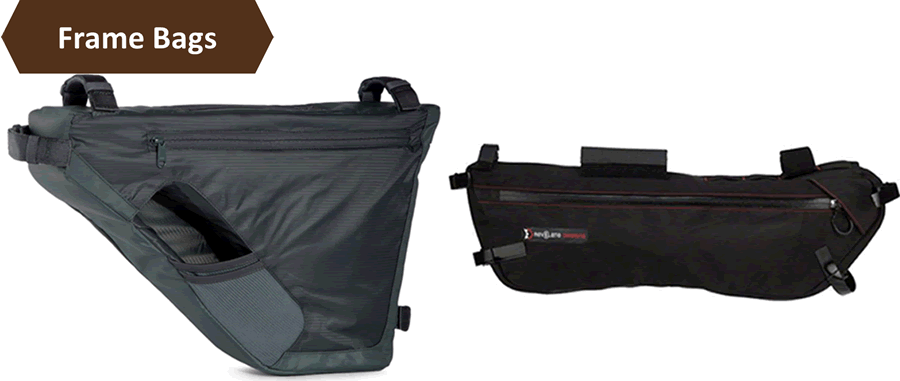
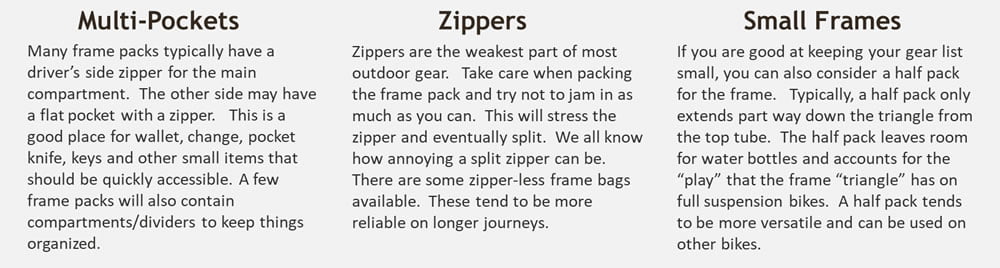
The framepack has been around for a while and takes advantage of a frames’s triangle area, in the middle of the down tube, seat tube and top tube. It’s usually lashed to the frame by a series of velcro straps. You can get frame packs for full suspension, hardtail and rigid bikes. Many frame packs are designed with a specific make/model in mind.
There are universally sized bags available that will fit most bikes. The frame bag stores heavier items. By storing heavy gear here, the bike maintains a low center of gravity and a balanced load front to back. Small frames and full suspension bikes will have limited room for the frame pack. The full frame pack takes the place of water bottle cages. If you choose to keep the water bottles, you can consider partial frame bags or attach bottle cages elsewhere.
SEAT PACKS
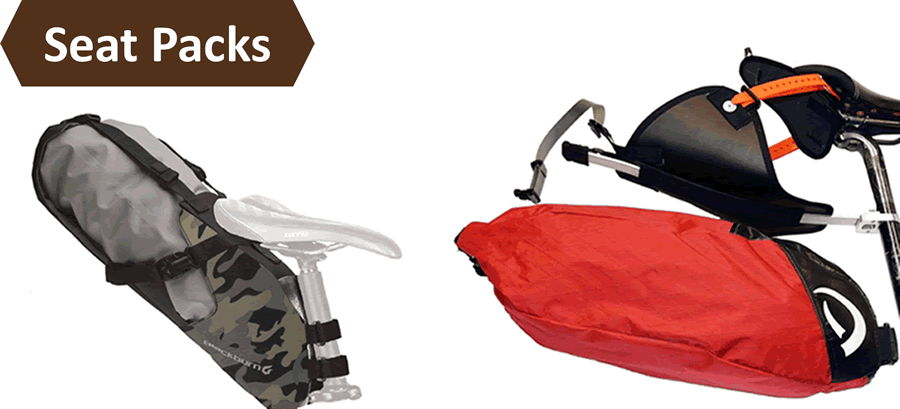
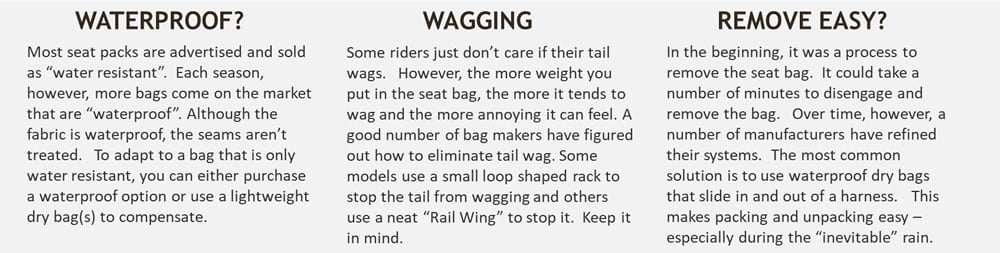
The seat pack may seem a little odd at first. It is a key piece for your bike packing setup however. It is shaped a little like a cone and is secured under the seat (saddle) and strapped to the seat post. Most seat packs run from 5 liters to more than 14 liters. You don’t get wind resistance with a seat pack like you do with panniers. When the riding gets rough, they don’t flop around and you aren’t constantly bumping your legs into them when forced to “hike-a-bike”. With panniers, a hike-a-bike situation is a little more awkward. The seat pack will probably be the best and most useful part of your bikepacking kit.
ANDLEBAR PACKS
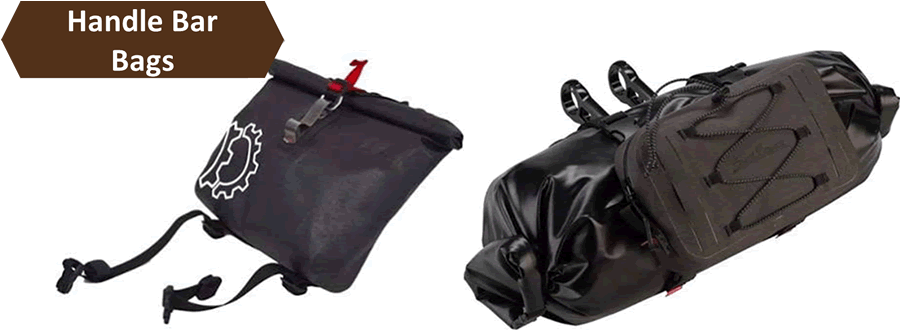
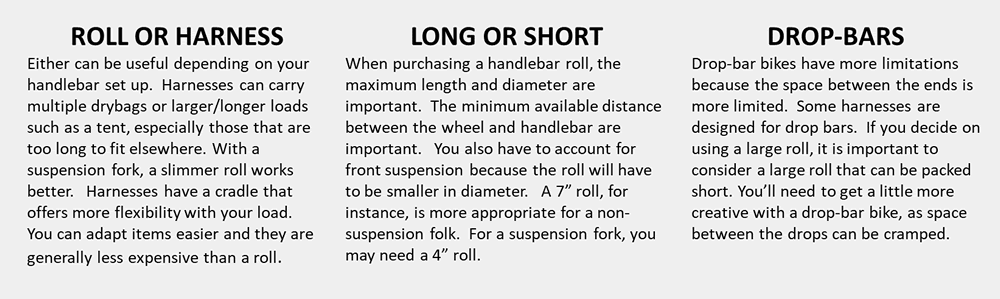
We’ve been strapping bags and baskets to our handlebars for years. It is perhaps the most natural spot to hold gear from colorful baskets to our friends riding on the handlebars when we were kids. Handlebar bags take this natural tendency and improve upon it with well developed attachment points, abrasion patches to reduce damage from rubbing, and a multitude of extra pockets for accessories. Even though attaching weigh to the front helps balance the bike, it is still a good idea to keep the handlebar load relatively light so handling doesn’t suffer too much.
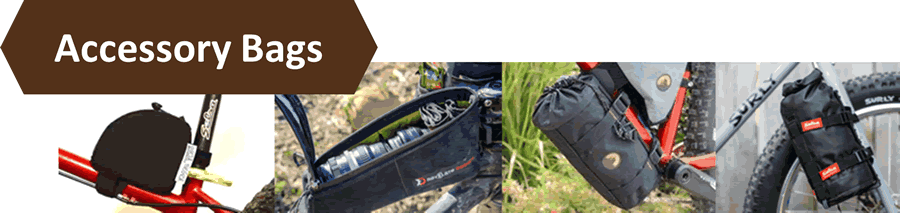
ACCESSORY BAGS
With our Frame Pack, Seat Bag and Handlebar setup complete, we come to realize that these places are where we store most of our “campsite” gear. Because it is tightly and meticulously packed away, it will be tough to quickly access on the road or during a break. That is where accessory bags come in. They add easy to access to snacks, compass, GPS, maps, keys, glasses, utensils, water purifying and other things needed while enroute to the next camp. These can be small can-shaped bags that fit on the stem or handlebars or they can be top tube bags that are mounted on the steerer tube or top tube. They are shaped like a motorcycle gas tank – sometimes referred to as a fuel tank, not only because of their shape and location, but because they also can hold energy snacks. There are many more accessory bags to fill the nooks and crannies of your bike. Imagination can be helpful in choosing, installing and packing accessory bags.
Big Bags
If you make the right choices with your gear and have minimal/ultralight sleeping gear, you will have adequate space with the framebag, seat pack, handlebar roll and accessory packs.
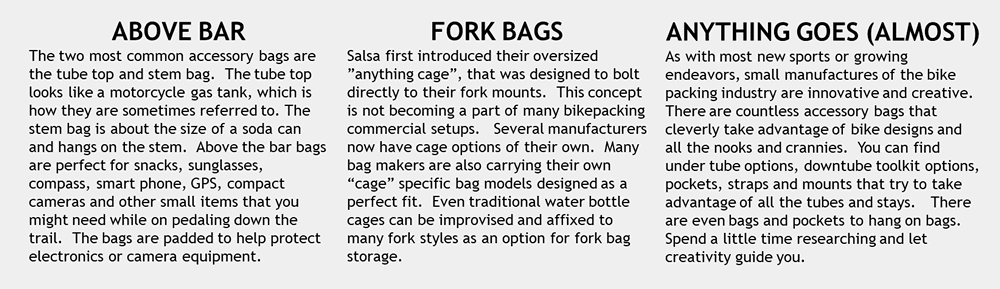
However, panniers can help when you need space for extra gear. Sometimes we require more cold weather gear or need a spot for our climbing equipment. In this case, it is more feasible to have small panniers on the front or back of the bike. Make sure you have plenty of tire clearance and that you have a hard tail or rigid bike with proper mounts.
Without a rigid bike, you can consider a rack especially made for a suspension bike. They will take a fair amount of fiddling. The Thule Pack and Pedal Tour Rack might fit the bill. It is designed to fit most suspension bikes. In our experience with the Thule, the cinch straps were not enough to hold a full load in brutal terrain. Without a smaller load and/or smoother terrain, full suspension bikes will have a shortcoming.
Don’t Forget the Back Pack
It is best to keep it lightweight, but a backpack can hold a lot of gear. A backpack can hold lightweight stuff such as sleep gear, freeze-dried meals or a lightweight shelter. The pack pack should be stable and not shift when riding. If you have a water bladder, drink that before the water loaded on your bike.
Kits
Dirt Cheap Kit <$100

A bikepacking setup can be a rather uncomplicated and created with minimum of equipment. To escape to the wilderness for a couple of days or a quick overnight, this is something you can put together in a few minutes. You might even have the equipment laying around. If not, you can order it from the links here and have it in a couple of days. A day pack, some dry bags, and some lashing can have you ready to head out in no time. This is a great way to discover bikepacking or a simple setup when the Jeep is to big for the trail to that remote camp.


Include electric tape, paracord (about 50′ should do the trick), duct tape (for contact points), and your day pack.
SEAT PACK – Use the closure bucket of the dry bag to secure it to the seat post. A webbing strap over the saddle rails and around the dry bag. You can use a bag between 5 to 7 liters. Adding something stiff to your bag will help with swaying. If you have an extra short webbing strap, you can secure the bottom better around the seat post.
HANDLEBAR PACK – Use your larger dry bag (approximately 15L). Strap it to the handlebars with the Voile Straps. Duct tape the contact points with the bards, buckles and cables to keep wear of the bag to a minimum.
BACKPACK – Keep it light and short. Too tall and the back of your helmet will hit it. You can keep light items here like sleeping gear, food, cooking gear, etc. A waist belt helps keep the backpack from flopping while riding.
FORK CAGES – Use the electrical tape to secure the cages to the forks. Many DIYers try using zip ties or straps, but they are not as effective as electrical tape. Electrical tape secures the cage, prevents shifting and doesn’t ruin the bike’s finish if you remove it. Make sure the cages are shifted a little to the rear. For even more security you can use hose clamps over the tape. You can hold water bottles, small dry bags, etc.
EXPEDITION KIT
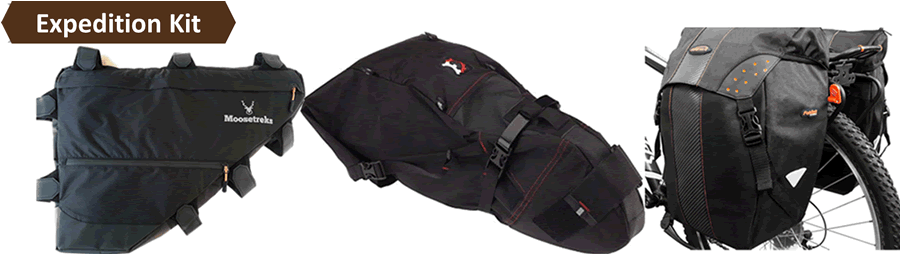
Try this if you need a little more room for a multi-day or winter outing. Perhaps you need to haul some supplies to camp, or bring rock climbing gear. In this kit, we explore some inexpensive options for an expedition kit. The gear here is a little more classy, a little more stable, more durable, and has quite a bit more room.


The Expedition Kit is for pack space. Panniers are optional, but consider using the rack for heavier seat loads.
SEAT PACK – There are lots of options here. Lots of more expensive higher quality options. The point of our choice here is best price with quality.
FRAME PACK – Be sure to measure your bike and pick the right size. Use a half bag option if you have a suspension bike.
HANDLEBAR PACK – This is a quality pack system form the makers of Apidura. It is difficult to find a cheaply priced, yet quality handlebar pack. Dry bags and straps work pretty well for the cost conscious bike packer. Be sure to tend the contact points with duct tape.
FORK CAGES – Just like in the budget kit, if you don’t have built in attachment points, you can use the electrical tape to secure the cages to the forks. Electrical tape secures the cage, prevents shifting and doesn’t ruin the bike’s finish if you remove it. Make sure the cages are shifted a little to the rear. You can hold water bottles, small dry bags, etc. You’ll need the cages and dry bags for not bottle gear. The straps of the cage can hold larger bags.
PANNIERS – This optional system has a good chance of working on most bikes including suspension bikes. If you have trouble with the rack staying tight because of rough trail (or too heavy of a load), stow the zip ties and go with ‘lectric tape. It holds better and isn’t prone to breaking or loosening.
BACKPACK – Keep it light and short. Too tall and the back of your helmet will hit it. You can keep light items here like sleeping gear, food, cooking gear, etc. A waist belt helps keep the backpack from flopping while riding.